BMW K bikes (Bricks)


You are not connected. Please login or register

View previous topic View next topic Go down  Message [Page 1 of 1]


1Back to top Go down   Re Fitting the AirBox Empty Re Fitting the AirBox Tue Nov 07, 2017 3:29 pm

DBRMN

DBRMN
Life time member
Life time member
So I've come to refit one side of the air box and I can't seem to get the big tube back into the box containing the air flow sensor, is there a special tool that is needed to put it back on or a special way of approaching this task? (Below is a picture of the tube in question)

Thanks,
DBRMN

Re Fitting the AirBox P1010918


2Back to top Go down   Re Fitting the AirBox Empty Re: Re Fitting the AirBox Tue Nov 07, 2017 4:28 pm

Point-Seven-five

Point-Seven-five
Life time member
Life time member
Have you tried to lube the parts with a bit of liquid soap?


__________________________________________________
Present: 1991 K100RS "Moby Brick Too"
 
Past:
1994 K75RT "Ilsa, She Wolf of the SS"
1988 K100RS SE "Special Ed"
1994 K75S "Cheetos"
1992 K100RS "Moby Brick" R.I.P.
1982 Honda FT500
1979 Honda XR185
1977 Honda XL125
1974 Honda XL125
1972 OSSA Pioneer 250
1968 Kawasaki 175
    

3Back to top Go down   Re Fitting the AirBox Empty Re Fitting the AirBox Tue Nov 07, 2017 6:31 pm

RT

RT
Life time member
Life time member
Hi mate
it's all about finding the right angle. You need a good swear vocabulary as well. Point seven five is right, add a little
detergent or vasoline but not too much and good luck
RT


__________________________________________________
2011 R1200RT
    

4Back to top Go down   Re Fitting the AirBox Empty Re: Re Fitting the AirBox Tue Nov 07, 2017 8:23 pm

Rick G

Rick G
admin
admin
Take the tube off the plenum then fit it into the plastic top section then fit the air flow meter into place then put the whole lot back onto the plenum. When the AFM is pushed into place it locks the tube into the air box top section.


__________________________________________________
"Man sacrifices his health in order to make money.
Then he sacrifices money to recuperate his health.
And then he is so anxious about the future that he does not enjoy the present; the result being that he does not live in the present or the future; he lives as if he is never going to die, and then dies having never really lived."   Dalai Lama


Bikes 1999 K1100 LT with a Big Block 1200
    

5Back to top Go down   Re Fitting the AirBox Empty Re: Re Fitting the AirBox Wed Nov 08, 2017 4:25 am

charlie99

charlie99
VIP
VIP
yep ...+1 Re Fitting the AirBox 112350


__________________________________________________
cheezy grin whilst riding, kinda bloke ....oh the joy !!!! ...... ( brick aviator )

'86 K100 RT..#0090401 ..."Gerty" ( Gertrude Von Clickandshift ) --------O%O
'86 k100 rs.. #######..  "Fred " (f(rame) red ) ( Fredrick leichtundschnell ) - -
bits and pieces from many kind friends across the k100 world ...with many thanks ..
1987 k100rs ########   "Red"  - (red sports rs TWB style )
1989 K100rt #009637   "Black Betty"  (naked rt ala Nigel , now sporting an rs main fairing )
    

6Back to top Go down   Re Fitting the AirBox Empty Re: Re Fitting the AirBox Wed Nov 08, 2017 6:58 am

Dai

Dai
Life time member
Life time member
+2.

Don't forget to make sure that the worm drive is on the correct way round. I've found that if the drive head (the bit where you put the screwdriver in) is towards the rear of the bike then it's easier to get at with a long thin screwdriver. You should also be able to get a finger or two on the clip to stop it from rotating while you tighten it up.


__________________________________________________
1983 K100 naked upgraded to K100LT spec after spending time as an RS and an RT
1987 K100RT
Others...
1978 Moto Guzzi 850-T3, 1979 Moto Guzzi 850-T3 California,1993 Moto Guzzi 1100ie California
2020 Royal Enfield Bullet 500
    

7Back to top Go down   Re Fitting the AirBox Empty Re: Re Fitting the AirBox Thu Nov 09, 2017 2:06 pm

DBRMN

DBRMN
Life time member
Life time member
Well Guys I managed to get it fitted today. I read through all your comments and a friend of mine suggested taking the metal part containing the Air flow sensor out first then fitting the upper part of the air box to the pipe then installing the air flow filter then installing the rest, which I tried and just as my friend was getting some WD40 I got the pipe in. Long story short it all came together and is fully installed. The only issue that I face now is that the two bolts on the inside of the lower section of the air box is only hand tight as I can't get a tool in there.


8Back to top Go down   Re Fitting the AirBox Empty Re: Re Fitting the AirBox Thu Nov 09, 2017 3:22 pm

Laitch

Laitch
Life time member
Life time member
DBRMN wrote:The only issue that I face now is that the two bolts on the inside of the lower section of the air box is only hand tight as I can't get a tool in there.
Looks like you might get more practice with that assembly. Practice makes perfect! Re Fitting the AirBox 212902


__________________________________________________
1995 K75 90,000 miles
    

9Back to top Go down   Re Fitting the AirBox Empty Re: Re Fitting the AirBox Thu Nov 09, 2017 6:41 pm

Dai

Dai
Life time member
Life time member
Put a pair of wire cutters through the loom where the MAF sub-loom joins the main wiring loom, then put a pair of 4-pin connectors on. Makes reseating the airbox a complete piece of p!ss.


__________________________________________________
1983 K100 naked upgraded to K100LT spec after spending time as an RS and an RT
1987 K100RT
Others...
1978 Moto Guzzi 850-T3, 1979 Moto Guzzi 850-T3 California,1993 Moto Guzzi 1100ie California
2020 Royal Enfield Bullet 500
    

10Back to top Go down   Re Fitting the AirBox Empty Re: Re Fitting the AirBox Fri Nov 10, 2017 2:06 am

charlie99

charlie99
VIP
VIP
DBRMN wrote:Well Guys I managed to get it fitted today. I read through all your comments and a friend of mine suggested taking the metal part containing the Air flow sensor out first then fitting the upper part of the air box to the pipe then installing the air flow filter then installing the rest, which I tried and just as my friend was getting some WD40 I got the pipe in. Long story short it all came together and is fully installed. The only issue that I face now is that the two bolts on the inside of the lower section of the air box is only hand tight as I can't get a tool in there.

pretty simple really
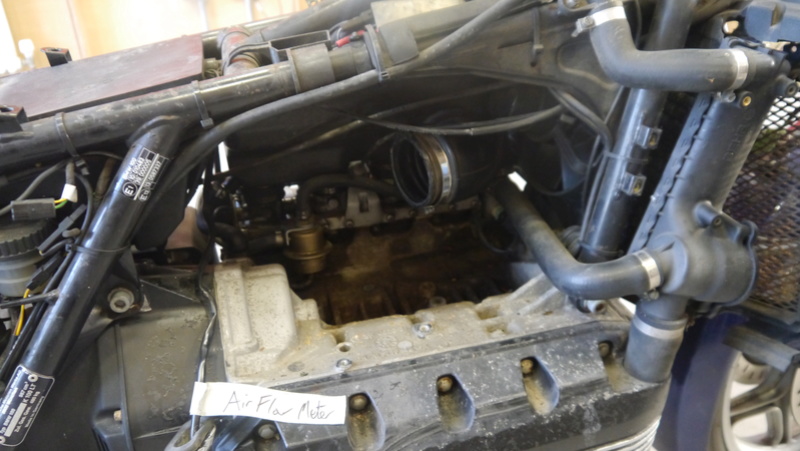
step one get the right angle for the induction pipe from the afm sorted out
then take it out again ( afm wiring still connected ) and fit the lower section properly to the engine block

then you can tighten the clamp on the top section of the air box , holding the afm in place

when mounting the induction pipe to the plenum ..use a long long screwdriver and make the screw head  for the clamp pointing down and forward  some what  maybe about 45 degrees off vertical towards the rear , which will allow you either to get a short philiips head driver  in there  or alternatively a super long one ..all the way from in front of the radiator bottom  between block and radiator ...then its a really simple process forever more

good luck


__________________________________________________
cheezy grin whilst riding, kinda bloke ....oh the joy !!!! ...... ( brick aviator )

'86 K100 RT..#0090401 ..."Gerty" ( Gertrude Von Clickandshift ) --------O%O
'86 k100 rs.. #######..  "Fred " (f(rame) red ) ( Fredrick leichtundschnell ) - -
bits and pieces from many kind friends across the k100 world ...with many thanks ..
1987 k100rs ########   "Red"  - (red sports rs TWB style )
1989 K100rt #009637   "Black Betty"  (naked rt ala Nigel , now sporting an rs main fairing )
    

Sponsored content


View previous topic View next topic Back to top  Message [Page 1 of 1]

Permissions in this forum:
You cannot reply to topics in this forum