I think the 1mm would work. If it bends too easy when you go to insert it, you'll know that you'll have to go with 1.5mm instead and certainly no thicker than that.
I'm definitely going to try this thank you so much for your help, and everyone else.
I think whats going to happen from here is I'm going to leave this thread till I'm actually trying to start the bike up, then I'll updated this thread daily as I start actually physically troubleshooting, thank you all so much for the information its going to make this a lot easier I think.
Sounds like a good plan. BTW I've done the wool thing, holding it in with a juice can. When I went for inspection, the guy told me to go away, get a muffler and come back ;-)
I had great success with the washer idea on my Buell Ulysses. Much better lower to mid range torque with the washer. Open pipes are good for high RPM WOT and a waste on the street.
glennpm wrote:Sounds like a good plan. BTW I've done the wool thing, holding it in with a juice can. When I went for inspection, the guy told me to go away, get a muffler and come back ;-)
I had great success with the washer idea on my Buell Ulysses. Much better lower to mid range torque with the washer. Open pipes are good for high RPM WOT and a waste on the street.
Glenn
Yeah I bet, its quite funny. I'm going to experiment with the washers, who doesn't love fixing their torque curve. Hopefully eventually I'll get my bike to an actual dyno and tuner, but I think thats a lot further down the line.
DBRMN wrote:I'm definitely going to try this thank you so much for your help, and everyone else.
To get back on track, follow Chris's observations in posts #4, #11, #17, and 21. The throttle bodies can be balanced following instructions in links posted in post #1.
I'll now extrapolate a principle from firearm safety into this discussion. During your experiment with the V-baffle, point the muzzle of that exhaust canister in a safe direction away from anything you don't want to harm.
__________________________________________________ 1995 K75 90,000 miles
DBRMN wrote:I'm definitely going to try this thank you so much for your help, and everyone else.
To get back on track, follow Chris's observations in posts #4, #11, #17, and 21. The throttle bodies can be balanced following instructions in links posted in post #1.
I'll now extrapolate a principle from firearm safety into this discussion. During your experiment with the V-baffle, point the muzzle of that exhaust canister in a safe direction away from anything you don't want to harm.
I understand they can be balanced, the question was how much they will change things. I think Chris's most informative post was No. 15 for my application, as I know that everything on the bike worked perfectly and the only variable was the exhaust being removed to make it not idle, meaning my injectors, spark plugs etc.. were all fine.
If you turn it around and insert the bend in first a tighter grip on the pipe could be obtained. A large flat bladed screwdriver could be used to push it in with a couple of taps with a hammer if needed. Regards Martin.
MartinW wrote:If you turn it around and insert the bend in first a tighter grip on the pipe could be obtained. A large flat bladed screwdriver could be used to push it in with a couple of taps with a hammer if needed. Regards Martin.
True true but wouldn't this be more of a permanent set up? I expect it would be quite hard to get out
Now I managed to get the bike started today, and there are few issues.
Firstly here is a video so you can instantly hear what I'm talking about:
So the main issue was I suspect there is an air leak somewhere along the air intake system I made. I didn't get a chance to test this because i didn't have any spraying fuel stuff. Is suspect this because when I revved the bike the revs would rise and hold for a bit and fall slowly, which is a common symptom of an air leak.
Another issue was the bike wouldn't idle very nicely, it would change revs seemingly at random however never stalling.
Also my fast idle switch does nothing at the moment since I took the throttle bodies apart so that will need diagnosing as well.
I've probably missed something but if anyone has any advice or suggestions I'd love to hear them.
So as I suspected air leak was one of the major sources of the problem. I narrowed down the air leak to one of the 3D printed parts I made (which supposedly isn't 100% air tight material but thats not a concern for now.) It had an inlayed o-ring at one end and silicone sealant at the other end, so I topped up the sealant and added another two o-rings with some grease this time. This gave me a much nicer tight snug fit. It removed alot of the problem.
The bike now no longer drastically changes revs at random when idling. It also drops revs relatively quickly when revved. So in that respect I'm happy.
However it still doesn't sound 100% happy idling, with slight changes in revs. Also the fast idle does absolutely nothing but it used to so thats definitely something I've put back together wrong, I attempted adjusting it but honestly didn't know what I was doing. The throttle cable also needs adjusting as theres no play in the throttle. But I've maxed out the adjustment at the handlebars, so i need to take the bike apart again.
If anyone knows anything about the issues I've mentioned that would be helpful, I suspect the air leak is still there just heavily reduced.
The setting of the 'Choke' and the idle adjustment are covered in the maintenance section of the BMW manual. If you haven't got a copy then check the portal to download one.
mike d wrote:The setting of the 'Choke' and the idle adjustment are covered in the maintenance section of the BMW manual. If you haven't got a copy then check the portal to download one.
Mike
Oh ye good idea I completely forgot about that, I checked my haynes manual but didn't find it very helpful. Thanks.
Ok so I adjusted the rest position of the throttle to be where the Main Throttle adjustment screw has no gap below it which as far as I'm concerned is how its supposed to be, I've read that the brass bypass screws should provide enough air for the bike to idle with the butterfly valves completely closed. However testing this early today, the bike struggled at around 700rpm and kept dying, in the end I think I flooded the engine and had to call it a day. Its very hard to adjust things when it won't even idle (Which it was at least doing yesterday however there was a substantial gap between the Main Throttle Adjustment screw and its rest position). I also am not entirely sure what adjustments do what.
I don't want to touch the brass screws yet as there for fine adjustment, though they could be the route of the problem, I measured how many turns they were today. I also know that the line for the 'choke' supposedly changes the engine idle speed but I have been moving that in and out so much my fingers hurt with no change.
I managed to get the choke to a point where it was actually changing the position of the throttle bodies a bit but that doesn't help me now.
Any reply would be much appreciated as this is concerning for me.
I've read that the brass bypass screws should provide enough air for the bike to idle with the butterfly valves completely closed.
Correct
I also know that the line for the 'choke' supposedly changes the engine idle speed
It's not a choke as such (as you would find on a carb). All it does is provide a fast idle.
Have you adjusted the TPS (Throttle Position Sensor). If you had it off the bike, and still want to use it, then that needs to be set correctly first. On the 2 valve engines it is basically a two position switch. However the bike will run without it fitted (unlike the 4 valve models).
Do you have a manometer to measure the vacuum at all four vacuum take off points? You'll probably be pissing in the wind trying to adjust the Big Brass Screws for idle without one.
mike d wrote:I've read that the brass bypass screws should provide enough air for the bike to idle with the butterfly valves completely closed.
Correct
I also know that the line for the 'choke' supposedly changes the engine idle speed
It's not a choke as such (as you would find on a carb). All it does is provide a fast idle.
Have you adjusted the TPS (Throttle Position Sensor). If you had it off the bike, and still want to use it, then that needs to be set correctly first. On the 2 valve engines it is basically a two position switch. However the bike will run without it fitted (unlike the 4 valve models).
Do you have a manometer to measure the vacuum at all four vacuum take off points? You'll probably be pissing in the wind trying to adjust the Big Brass Screws for idle without one.
Mike
I have adjusted the TPS, I've tried it in several different positions to no avail. I've also heard like you mentioned its not critical for the bike to run, so I suspect its not the root of the problem.
I've heard about them, and of people making their own but the only ones worth getting at £80 and I don't have that kind of money at the moment would have to save up. But your definitely right, there is no way you could adjust the brass screws 'by ear'.
I suspect the route causes is the fast idle cable. However I spent a while fiddling with it, putting it every which way and it seemed to do next to nothing.
Apologies if the following is a bit laboured, but you keep mentioning that you don't fully understand the functions of the various adjustments and stuff. Hope this helps.
The fast idle is just a simple mechanism to hold the throttle butterflies slightly more open than normal tickover. It does exactly the same as holding the throttle twistgrip slightly open. Best thing to do when you are about to work on the throttles is back it off so's the cable is as slack as, and there's no chance of it affecting anything. I don't even have one on the K75.
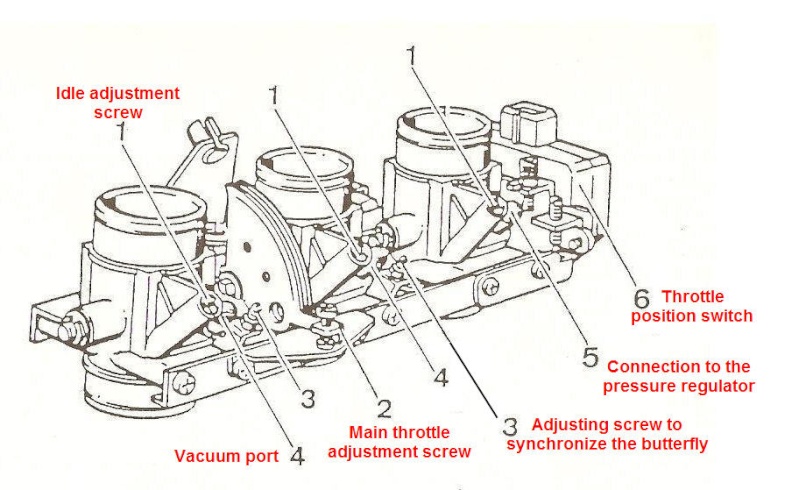
The Throttle Stop is what you are referring to as the 'Main Throttle Adjustment Screw'. You're quite right to think that it should come to rest on the circular metal anvil. If you back it off so that it doesn't (i.e. you can see a slight gap even when the throttle twistgrip is fully released) then that means that one or more of the butterflies has closed so much that it is jamming in the throttle bore. You should avoid doing this as it can cause wear. If the throttle stop screw has already been twiddled with, then a best guess base setting can be got by backing it out to give a gap, then screwing it down so's it just takes the 'weight' of the throttle spindle springs. Open the throttle a small distance and release it - you should be able to hear a definite click as the throttle stop screw strikes the metal anvil.
Tickover.
When the bike is ticking over, it is getting just a tiny amount of air from 2 sources: 1 a small leak past the butterflies themselves (because the throttle stop screw has been set so's they don't fully jam in the throttle bores) and 2: a small amount from the brass bypass screws.
The function of the brass bypass screws is mainly to compensate for the different 'leaks' past the individual throttle butterflies - due to manufacturing tolerances and wear. This balances the air flow into each cylinder and gives a smooth tickover. More importantly, it ensures that the bike will pick up revs cleanly for a smooth set off.
The linkage screws (the ones you are best not touching) between the throttles are used also to balance the air flows, but more in the region of small throttle openings. Again, this is for smooth running and clean pick up. If these are twiddled with, it will also screw up the ability of the butterflies to close in a synchronised manner - one or more will stay open whilst the others shut. If this happens, then it can be difficult to get the tickover slow enough - the 'open' butterfly will allow air past, even if the Throttle Stop Screw is backed right off and the other butterflies are jamming in the bores as a consequence.
As you have identified, the first thing to eliminate is any air leak. If a leak occurs after the AFM but before the butterflies, then the mixture could be too lean, owing to unmetered air entering the system. The tickover should still be even though, if everything else is correctly adjusted. If the leak occurs after the butterflies (more likely owing to the higher vacuum) then the tickover will be properly screwed because neither the butterfly nor the brass bypass screw will have any chance of controlling the amount of air entering that cylinder. As has already been said, leaks can occur between the mating faces of the rubber inlet manifolds and the cylinder head. I always use RTV on these joints (ever since I spent ages trying to cure a rough & unresponsive tickover funnily enough)
If you have cured any air leaks and your tickover is still poor, then you could try cleaning the brass bypass screws. Before you unscrew them, screw each one in carefully as far as it will go, but don't force it. Count the turns and, if everything's okay, the screws should each have been somewhere in the region of 3/4 to 1 1/2 turns out from fully shut. If not, then this might indicate that somebody has already tried to deal with a butterfly/air leak problem by going at the brass screws. That never works btw.
Once you've cleaned the screws (they can get sooty on the tapered business end) replace them, either with the same number of turns as you found them to have or, if they were haywire, 3/4 of a turn out from fully closed. If you still can't get an even tickover, then you really need a carbtune or similar to see what's going off.
Another thing you can look at is whether the tickover responds to each brass bypass screw. If things are working properly, then screwing the brass bypass screws in and out by a quarter/half a turn should noticeably affect the tickover. If this doesn't happen, then it can indicate either an air leak after the butterfly, or a problem with the throttle linkage screws - i.e. a butterfly being more 'open' than the others.
If everything's looking okay, but the brass bypass screws all need to be screwed out beyond 1 1/2 turns to get the tickover speed high enough, then you should screw the Throttle Stop Screw down a little. This will speed the tickover up, and you can then screw all 4 brass bypass screws back in to get the tickever back down to the right speed.
As already advised though, a Carbtune or equivalent is necessary to do these settings to the degree required for a decent tickover and slow speed pickup.
__________________________________________________ Sometimes I'm not really Suzi Quatro.
chris846 wrote:Apologies if the following is a bit laboured, but you keep mentioning that you don't fully understand the functions of the various adjustments and stuff. Hope this helps.
The fast idle is just a simple mechanism to hold the throttle butterflies slightly more open than normal tickover. It does exactly the same as holding the throttle twistgrip slightly open. Best thing to do when you are about to work on the throttles is back it off so's the cable is as slack as, and there's no chance of it affecting anything. I don't even have one on the K75.
The Throttle Stop is what you are referring to as the 'Main Throttle Adjustment Screw'. You're quite right to think that it should come to rest on the circular metal anvil. If you back it off so that it doesn't (i.e. you can see a slight gap even when the throttle twistgrip is fully released) then that means that one or more of the butterflies has closed so much that it is jamming in the throttle bore. You should avoid doing this as it can cause wear. If the throttle stop screw has already been twiddled with, then a best guess base setting can be got by backing it out to give a gap, then screwing it down so's it just takes the 'weight' of the throttle spindle springs. Open the throttle a small distance and release it - you should be able to hear a definite click as the throttle stop screw strikes the metal anvil.
Tickover.
When the bike is ticking over, it is getting just a tiny amount of air from 2 sources: 1 a small leak past the butterflies themselves (because the throttle stop screw has been set so's they don't fully jam in the throttle bores) and 2: a small amount from the brass bypass screws.
The function of the brass bypass screws is mainly to compensate for the different 'leaks' past the individual throttle butterflies - due to manufacturing tolerances and wear. This balances the air flow into each cylinder and gives a smooth tickover. More importantly, it ensures that the bike will pick up revs cleanly for a smooth set off.
The linkage screws (the ones you are best not touching) between the throttles are used also to balance the air flows, but more in the region of small throttle openings. Again, this is for smooth running and clean pick up. If these are twiddled with, it will also screw up the ability of the butterflies to close in a synchronised manner - one or more will stay open whilst the others shut. If this happens, then it can be difficult to get the tickover slow enough - the 'open' butterfly will allow air past, even if the Throttle Stop Screw is backed right off and the other butterflies are jamming in the bores as a consequence.
As you have identified, the first thing to eliminate is any air leak. If a leak occurs after the AFM but before the butterflies, then the mixture could be too lean, owing to unmetered air entering the system. The tickover should still be even though, if everything else is correctly adjusted. If the leak occurs after the butterflies (more likely owing to the higher vacuum) then the tickover will be properly screwed because neither the butterfly nor the brass bypass screw will have any chance of controlling the amount of air entering that cylinder. As has already been said, leaks can occur between the mating faces of the rubber inlet manifolds and the cylinder head. I always use RTV on these joints (ever since I spent ages trying to cure a rough & unresponsive tickover funnily enough)
If you have cured any air leaks and your tickover is still poor, then you could try cleaning the brass bypass screws. Before you unscrew them, screw each one in carefully as far as it will go, but don't force it. Count the turns and, if everything's okay, the screws should each have been somewhere in the region of 3/4 to 1 1/2 turns out from fully shut. If not, then this might indicate that somebody has already tried to deal with a butterfly/air leak problem by going at the brass screws. That never works btw.
Once you've cleaned the screws (they can get sooty on the tapered business end) replace them, either with the same number of turns as you found them to have or, if they were haywire, 3/4 of a turn out from fully closed. If you still can't get an even tickover, then you really need a carbtune or similar to see what's going off.
Another thing you can look at is whether the tickover responds to each brass bypass screw. If things are working properly, then screwing the brass bypass screws in and out by a quarter/half a turn should noticeably affect the tickover. If this doesn't happen, then it can indicate either an air leak after the butterfly, or a problem with the throttle linkage screws - i.e. a butterfly being more 'open' than the others.
If everything's looking okay, but the brass bypass screws all need to be screwed out beyond 1 1/2 turns to get the tickover speed high enough, then you should screw the Throttle Stop Screw down a little. This will speed the tickover up, and you can then screw all 4 brass bypass screws back in to get the tickever back down to the right speed.
As already advised though, a Carbtune or equivalent is necessary to do these settings to the degree required for a decent tickover and slow speed pickup.
Thanks so much for your reply Chris that was a very interesting read.
I suspected the brass screws might be out of sync, I do remember touching one my accident during my disassembly, but I definitely know it was only one. So I thought I would do as you mentioned and just test where each one was and this is what I found: (In order from front of bike to back)
2 turns 1.75 turns 1.5 turns 1.25 turns
Which doesn't immediately point out which one is the odd one out. I then tested each of them at one turn out and at 1.5 turns out but this did nothing to improve its ability to idle. (However I may have flooded the engine by this point its hard to tell.) Also while I'm fiddling with the brass screws I might as well clean them up like you said, I've also heard the o-rings might need replacing?
Now luckily before disassembly I remember being severely warned about not touching anything with blue paint on it, and if we remember the bike ran beautifully before disassembly. Therefore I know I haven't touched anything with blue paint so I will proceed not to touch it and I will assume nothing with blue paint is a factor, if this is a reasonable assumption?
In terms of leaks, there are two possible places, throttle body booting to engine casing as I didn't apply any liquid gasket. And one end of my 3D printed part I suspect the o-ring side rather than the silicon sealed side. But as you mentioned if its the 3D printed part it should still idle.
Also whats weird is that after I fixed the big air leak I talked about the bike idled far better but still not 100% healthy. However this was with a gap of about 10 mm between the throttle adjustment screw and the metal anvil. Heres the video:
So what would you suggest, should I tighten the throttle cable again so that I can at least get the bike to idle again, then make my adjustments from there?
I want to get a CarbTune, but I want a good quality one and don't have time to make my own or the money for an £80 one at the moment. I also considered getting some carb cleaner or starter fluid to test for leaks. Because whats also curious is if you look at the first video I posted yesterday at time 0.22 you can see the dust on the bike blow about when I rev, which isn't very scientific but could mean leak by the boots.
If I were in your situation right now, I wouldn't do anything else apart from sealing those bottom inlet manifolds to the cylinder head - just a bead of RTV around the bottom face of the manifold.
Whilst the throttle assembly is off, try holding it up to the light (the light! the light!) and peering down the throttle bores. You should see a tiny crescent of daylight around the edge of the butterflies, which should be equal on all four throttles. You - can - play with the Throttle Stop Screw whilst doing this and see if the daylight crescents grow and shrink together.
(Use weakish daylight - electric light seems to grow as it comes through the narrow crescent and it won't give the same accuracy - with your background you should be able to tell us why this is)
Now I'm not writing this at all - you are simply hallucinating this paragraph. But, if those daylight crescents aren't the same size, you can have a go at the blue-painted screws to equalize them. This is only a good idea if the throttles have been disassembled at some point and not reset correctly, or, someone has been at the blue painted screws. I have not said this though, remember?
__________________________________________________ Sometimes I'm not really Suzi Quatro.
chris846 wrote:If I were in your situation right now, I wouldn't do anything else apart from sealing those bottom inlet manifolds to the cylinder head - just a bead of RTV around the bottom face of the manifold.
Whilst the throttle assembly is off, try holding it up to the light (the light! the light!) and peering down the throttle bores. You should see a tiny crescent of daylight around the edge of the butterflies, which should be equal on all four throttles. You - can - play with the Throttle Stop Screw whilst doing this and see if the daylight crescents grow and shrink together.
(Use weakish daylight - electric light seems to grow as it comes through the narrow crescent and it won't give the same accuracy - with your background you should be able to tell us why this is)
Now I'm not writing this at all - you are simply hallucinating this paragraph. But, if those daylight crescents aren't the same size, you can have a go at the blue-painted screws to equalize them. This is only a good idea if the throttles have been disassembled at some point and not reset correctly, or, someone has been at the blue painted screws. I have not said this though, remember?
Well that is going to be a fun job. I think its going to have to wait until after my A Levels now sadly, which is September time. This sounds like its at least going to take a week or maybe two and I don't have that kind of time.
Say what I didn't hear anything what are you on about??
chris846 wrote:If you promise to RTV those inlet rubbers to the cylinder head, I'll post my Carbtune for you to borrow.
That would be amazing, thank you so much for your offer. I'll definitely take you up on that in September!
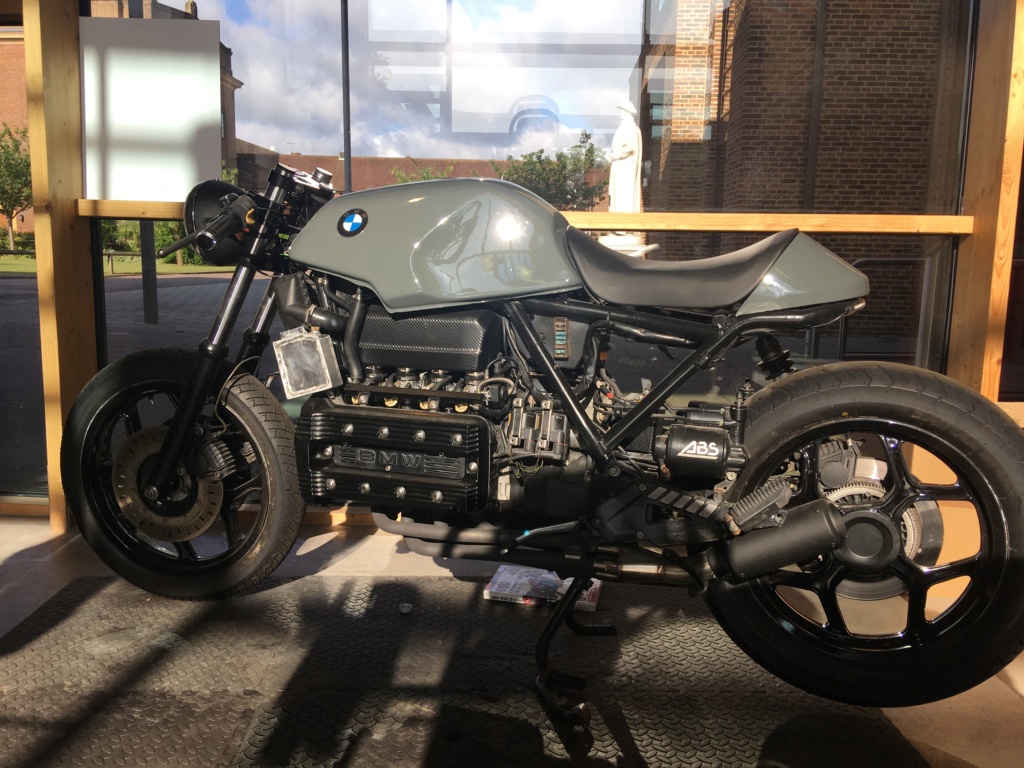
Little story time, didn't have a good day today. Thought I'd take the bike out for one last test idle to see if there wasn't something obvious that i'd missed, and I dropped the bike... so took that as a sign and I'm throwing in the towel till September. (Out of interest it still ran like a 70 year old smoker's lungs)
I managed to pick it back up by myself which I was surprised about, the damage isn't too bad. The bar end indicator is cracked and the FRESHLY PAINTED engine cover has a lovely big scratch and scuff, oh well we don't cry about these sorts of things. lol
DBRMN provided great advice on potential leakage. Also replace the O-rings on the brass bypass screws. I didn't see this mentioned so sorry if I missed it. it is another potential leakage source.
DBRMN provided great advice on potential leakage. Also replace the O-rings on the brass bypass screws. I didn't see this mentioned so sorry if I missed it. it is another potential leakage source.
Glenn
Yeah I have heard they can sometimes be the issue thanks for reminding me, I don't think it is on this thread yet. Definitely something that can easily be overlooked.
DBRMN wrote: Little story time, didn't have a good day today. Thought I'd take the bike out for one last test idle to see if there wasn't something obvious that i'd missed, and I dropped the bike...
I managed to pick it back up by myself which I was surprised about, the damage isn't too bad.
Sorry to hear about the incident, such a nice looking bike. You may not be aware of the solo lift technique, it works, DAMHIK 🥵. See https:/ youtu.be/84YfDGKA4Og
Failing that try: (see my avatar).
__________________________________________________ 1985 BMW K100RT + Hedingham HUB and LL’s. VIN 0028106. 1986 K100RS in boxes. VIN 0141918. 1954 Royal Enfield 350 Bullet. Original. 2000 Hayabusa with Charnwood chair, Wasp forks and EZS wheels.
DBRMN wrote: Little story time, didn't have a good day today. Thought I'd take the bike out for one last test idle to see if there wasn't something obvious that i'd missed, and I dropped the bike...
I managed to pick it back up by myself which I was surprised about, the damage isn't too bad.
Sorry to hear about the incident, such a nice looking bike. You may not be aware of the solo lift technique, it works, DAMHIK 🥵. See https:/ youtu.be/84YfDGKA4Og
Failing that try: (see my avatar).
Yeah bit depressing. I actually remember seeing a video very similar to that one which definitely came in handy. It's a VERY heavy bike I don't know what I expected lol. I actually lifted it facing the bike instead which seemed to work.
I have just overhauled the brass bypass screws and o-rings on my 1983 K100 and on a second hand throttle body unit I have as a spare. Findings: In my case both sets of screws saw the o-rings in a perished state (intact in their groove BUT with a web of splitting rubber - not long for this world). I have replaced them with new Viton (FKM) o-rings because Viton can withstand prolonged temperatures of up to 205C, and is resistant to ozone exposure and copes well with petrol. A search on eBay threw up a number of Viton o-ring kits and individual sizes of o-rings, but I am suspicious of what a number of sellers are offering. Several offerings stated their o-rings were Viton, however photos of the boxes they came in stated they were Nitrile (NBR or Buna-N). Their are a lot of o-rings out there that are not as advertised. Nitrile has a max safe temperature limit of 110C. My conclusion about sourcing the best o-rings for the brass bypass screws is to go to a reputable bearing/seals trade supplier and ask them to match your o-rings with quality Viton replacements. Generally Viton is a dark brown colour, although there are some exceptions. Before removing each individual brass screw, I screwed them in until they stopped and recorded the number of turns in. There were some significant differences. I then returned them to their last setting before backing them out, noting the number of turns required to remove each screw. I used very fine sandpaper to gently clean the end point of each screw until I had bright brass, before cleaning the screw with throttle body cleaner. Next I cleaned the area in the throttle body where the bypass screw fits in by using Q-tips (cotton buds) soaked in throttle body cleaner. I reinstalled each screw with new o-rings until gently tight then backed them off a consistent 1.25 turns (range for K100 is reported as 1-1.5 turns out).
redrockmania wrote:I have just overhauled the brass bypass screws and o-rings on my 1983 K100 and on a second hand throttle body unit I have as a spare. Findings: In my case both sets of screws saw the o-rings in a perished state (intact in their groove BUT with a web of splitting rubber - not long for this world). I have replaced them with new Viton (FKM) o-rings because Viton can withstand prolonged temperatures of up to 205C, and is resistant to ozone exposure and copes well with petrol. A search on eBay threw up a number of Viton o-ring kits and individual sizes of o-rings, but I am suspicious of what a number of sellers are offering. Several offerings stated their o-rings were Viton, however photos of the boxes they came in stated they were Nitrile (NBR or Buna-N). Their are a lot of o-rings out there that are not as advertised. Nitrile has a max safe temperature limit of 110C. My conclusion about sourcing the best o-rings for the brass bypass screws is to go to a reputable bearing/seals trade supplier and ask them to match your o-rings with quality Viton replacements. Generally Viton is a dark brown colour, although there are some exceptions. Before removing each individual brass screw, I screwed them in until they stopped and recorded the number of turns in. There were some significant differences. I then returned them to their last setting before backing them out, noting the number of turns required to remove each screw. I used very fine sandpaper to gently clean the end point of each screw until I had bright brass, before cleaning the screw with throttle body cleaner. Next I cleaned the area in the throttle body where the bypass screw fits in by using Q-tips (cotton buds) soaked in throttle body cleaner. I reinstalled each screw with new o-rings until gently tight then backed them off a consistent 1.25 turns (range for K100 is reported as 1-1.5 turns out).
Did you get yours from eBay in the end? And do you mind telling me how much they cost you? For reference.
So what did you do with the recorded information about how many turns they were backed out originally? If you then just turned them out 1.25, is this for reference later if 1.25 isn't perfect?
You really should buy or borrow a carb balancer to sync the throttle bodies. It's really the only reliable way to get the airflow balanced and will make the bike run much smoother.
duck wrote:You really should buy or borrow a carb balancer to sync the throttle bodies. It's really the only reliable way to get the airflow balanced and will make the bike run much smoother.
Absolutely! A good one needn't cost you a lot if you have a couple glass bottles, and access to a few parts. The pictured unit cost me about $15 and is amazingly accurate and easy to use.
Yeah I've seen a few people do this I found a really good thread that I book-marked, I'll link it below. Out of curiosity how long did that take you to make, was it very hard?
duck wrote:You really should buy or borrow a carb balancer to sync the throttle bodies. It's really the only reliable way to get the airflow balanced and will make the bike run much smoother.
Yeah I agree since I know that I fiddled with one screw, so it definitely isn't what it used to be.
duck wrote:You really should buy or borrow a carb balancer to sync the throttle bodies. It's really the only reliable way to get the airflow balanced and will make the bike run much smoother.
Absolutely! A good one needn't cost you a lot if you have a couple glass bottles, and access to a few parts. The pictured unit cost me about $15 and is amazingly accurate and easy to use.
Yeah I've seen a few people do this I found a really good thread that I book-marked, I'll link it below. Out of curiosity how long did that take you to make, was it very hard?
Most of the parts are at the hardware store. The stoppers with two holes can be had online from scientific supply sites. The fluid is ATF which flows slow enough through the tubes to make adjustment easier. Once you have all the parts it only takes an hour to put it all together.
The frame was made out of scrap wood on a boring winter evening a couple years after the rest of the apparatus was made.
to DMRMN's post: Over many years I have acquired 5 boxes of various types of o-rings. I have a box of Viton o-rings (purchased from USA I am satisfied are Viton as labelled and sold) My box of "Nitrile" o-rings purchased on eBay on the basis they were described as Nitrile have no labelling on the box that they are Nitrile - I suspect they are not. Looking yesterday on eBay I saw a number of specific sizes of green o-rings described by Chinese sellers as being Viton, but I am highly suspicious and several o-ring kits listed as Viton when you go to the picture of the kit as posted by the seller see them labelled as Nitrile. The case for going to a specialist bearing/seals industrial parts supplier is as follows: You will get genuine Viton o-rings, If you bring one of your brass screws in with an old o-ring, they will give you an accurate match and sell you the number that you need. This will probably be a lot cheaper than buying a kit. Kits often contain 300+ o-rings of various sizes, the majority of which you will probable never use. A genuine Viton o-ring should last a long time. When adjusting the screws I selected 1.25 turns out as a standardised mid-point (range: 1 - 1.5 turns out) to start with. Ducks advice is right - you then need to use a Carb Balancer to synchronise. I have a number of notebooks I keep for my 2 K100's where I record details of various tuning/servicing procedures starting with BMW specifications/ranges, then what I measure on initial inspection, details of what I have replaced and details of the measurement/specification after overhaul. Your camera and notebook are your friend.
So I'm finally on the back end of my exams, only two left. Thought I'd give myself a break so spent today on the bike as a detox.
Managed to get a lot done, went from this:
To this:
So next step is to triple check everything. Step one is refit the rubber boots with a liquid gasket and torqued down to spec (The RTV that Chris talks about earlier in the thread). I've already tightened everything on the throttle bodies, specifically the Oetiker Clamps. If anyone else has any suggestions of what I should do while its all disassembled to prevent air leaks?
If the boots aren't new or in good shape, you could have a crack that the RTV at the base won't fix. Check the boots real well, bending them along the axis and make sure there are no cracks. If they're good to go, the RTV Chris mentions, will get rid on another possible leak source.
If the boots aren't new or in good shape, you could have a crack that the RTV at the base won't fix. Check the boots real well, bending them along the axis and make sure there are no cracks. If they're good to go, the RTV Chris mentions, will get rid on another possible leak source.
Glenn
Very, very good therapy! Cant think of a better way to spend a day.
Yeah I will, that sounds like a plan. I was looking at this stuff, is this the RTV you mean?
Sounds like the right stuff. The high temperature is important but at this location on the motor, it doesn't get real hot like the exhaust for example.
Make sure that after you assemble with the RTV, that you let it cure at least over night before you manipulate these joints in the process of finishing up your TB re-installation.
glennpm wrote:Sounds like the right stuff. The high temperature is important but at this location on the motor, it doesn't get real hot like the exhaust for example.
Make sure that after you assemble with the RTV, that you let it cure at least over night before you manipulate these joints in the process of finishing up your TB re-installation.
chris846 wrote:Two more exams - good luck. You'll be ready for that manometer then eh?
I appreciate the offer but I think I'm just going to save up for my own one, because hopefully after exams I'll have income from a side project, and with all the custom work I'm doing I think owning one is the right way to go. Also don't want to take advantage. Thank you though, your offer just shows how nice the K community is.
I'm going to first see how well it runs with just fixing the air leak.
Great to see you still have a bit of time to spend with your bike DBRMN. Wrenching is also my break from the 'grown up' things that insert themselves into my life.
I've spent a whack of money on tools but the manometer was one piece that I chose to make. I had borrowed a MotionPro unit once but I prefer my own much better. It was easy to do as well.
Good luck with your exams when you get back to them.
Woodie wrote:Great to see you still have a bit of time to spend with your bike DBRMN. Wrenching is also my break from the 'grown up' things that insert themselves into my life.
I've spent a whack of money on tools but the manometer was one piece that I chose to make. I had borrowed a MotionPro unit once but I prefer my own much better. It was easy to do as well.
Good luck with your exams when you get back to them.
Yeah that was my thought exactly, its just one of those tools you should own. Especially as I plan on changing the exhaust in the future.
Thank you got one Wednesday and Friday then its back on the bike everyday!! (Till the end of school)


 Re: Tuning My K100 Sat Feb 09, 2019 11:39 am


 Yeah I bet, its quite funny. I'm going to experiment with the washers, who doesn't love fixing their torque curve. Hopefully eventually I'll get my bike to an actual dyno and tuner, but I think thats a lot further down the line.


 K1100RS/LT - R1200RT - R1100RS - Cagiva SST 350 Ala Verde - K75LT project - K75 Schurgers - K75S - K1100RS - K75RT - K75C