BMW K bikes (Bricks)


You are not connected. Please login or register

View previous topic View next topic Go down  Message [Page 1 of 1]


1Back to top Go down   Replacing the gear box Empty Replacing the gear box Thu Feb 17, 2011 6:17 pm

Crazy Frog

Crazy Frog
admin
admin
As I was busy for the last year doing major renovation on my house, I didn't have too much time to work on the bikes (or ride).
Today, I finally decided to tackle replacing the gear box on the K75.

First the job starts with a good cleaning of the used gear box. After removing the clutch mechanism, I discovered that the piston pushing the clutch push rod was scored and didn't move freely. This maybe the problem of people experiencing a heavy clutch lever.

Replacing the gear box Dsc_1519

Replacing the gear box Dsc_1518

I am posting these pictures just as a reminder of the procedure. It took only 2 1/2 hours to get to this stage. and this is a very easy job.(notice the high tech support on the back of the bike).

Replacing the gear box Dsc_1515

Before removing anything, I always be sure to have the clutch lever tied to avoid tearing off the boot on the clutch mechanism as well as having a support under the swing arm to protect tearing off the front boot on the gearbox when pulling the shaft and the swing arm.

Replacing the gear box Dsc_1517

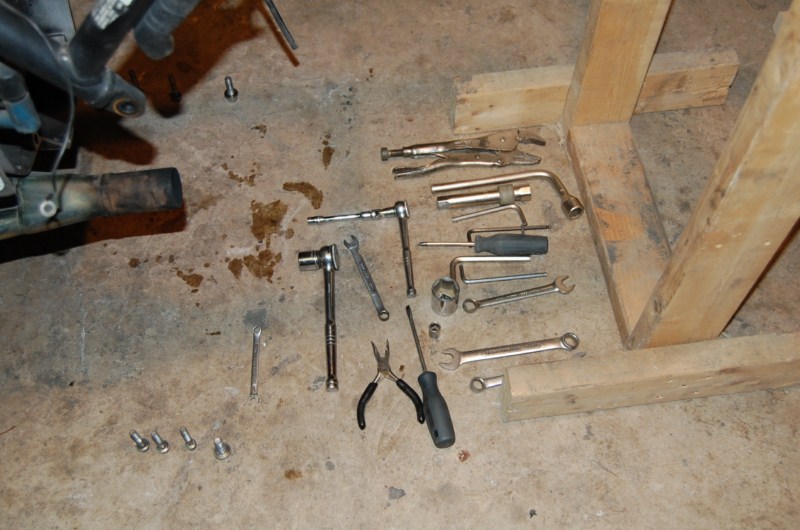
At the end, the gear box is off and this is all the tools that I used for the job. Notice that I have only 8 screws laying on the ground as when I remove something, I always put the screws back to where they belong.

Replacing the gear box Dsc_1520

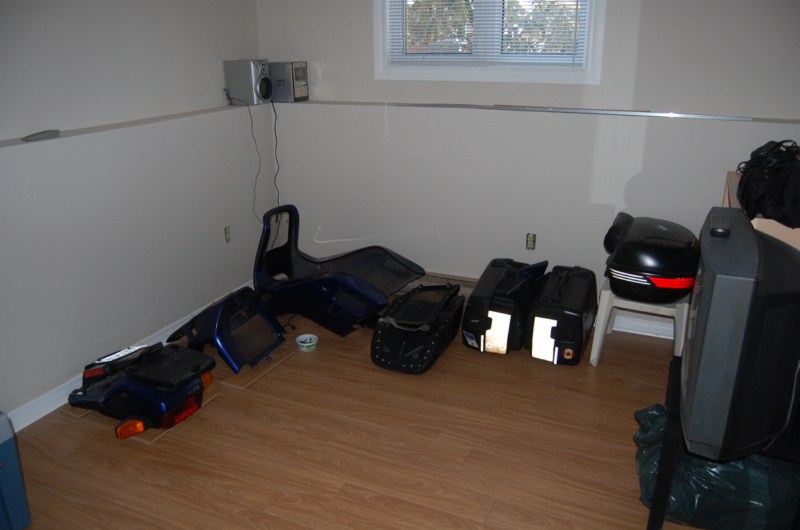
Now the kicker..... Don't tell my wife that she cannot furnish the new spare bedroom that I just finished building because....... I am temporarily storing my bike's part there. By the way, notice the 3M reflective tape on the saddle bags and the strips on the top case? This is black in daytime but really glows with the camera's flash.
Replacing the gear box Dsc_1521

To be continued.....


__________________________________________________
Replacing the gear box Frog15Replacing the gear box Logo2101986 k75, 1985 K100rt, 1985 K100rt/EML GT2 sidecar, 1999 K1200lt/Hannigan Astro Sport sidecar.
    

2Back to top Go down   Replacing the gear box Empty Re: Replacing the gear box Sat Feb 19, 2011 7:08 am

BIG D

BIG D
Life time member
Life time member
Cool

Nice job Bert I followed your last write up when I removed my Gearbox the hardest part was removing the swing arm pivots they where tight and took a bit of leverage to extract them, more please Very Happy

BIG D


3Back to top Go down   Replacing the gear box Empty Re: Replacing the gear box Sat Feb 19, 2011 9:13 pm

K-BIKE

avatar
Life time member
Life time member
Good stuff!
Regards,
K-BIKE


4Back to top Go down   Replacing the gear box Empty Re: Replacing the gear box Mon Feb 21, 2011 7:12 am

Stout

avatar
active member
active member
Compared to what I used on my K100RT, that IS a high tech support. I just slid a small folding workbench under there. I left all my fairings (except the small side covers) on too.

This is probably already on your list, but it is well worth disassembling the clutch bellcrank to clean and lubricate the needle roller bearings inside.


5Back to top Go down   Replacing the gear box Empty Re: Replacing the gear box Mon Feb 21, 2011 10:41 am

Crazy Frog

Crazy Frog
admin
admin
Stout wrote: This is probably already on your list, but it is well worth disassembling the clutch bellcrank to clean and lubricate the needle roller bearings inside.

Sorry, I don't know what needle rollers you are talking about. Anything on the back of the clutch housing are lubricated by the motor oil.
What is important to grease are the splines of the gear box input shaft (This is maybe what you wanted to refer to). You should use the same grease as for the splines on the drive shaft.
The external needle bearings requiring a great care (cleaning and greasing) are the ones on the clutch lever. BMW wants $228 for the lever alone. It must be a piece of gold coated with aluminum affraid See the detailed prices here


__________________________________________________
Replacing the gear box Frog15Replacing the gear box Logo2101986 k75, 1985 K100rt, 1985 K100rt/EML GT2 sidecar, 1999 K1200lt/Hannigan Astro Sport sidecar.
    

6Back to top Go down   Replacing the gear box Empty Re: Replacing the gear box Wed Feb 23, 2011 9:26 pm

Crazy Frog

Crazy Frog
admin
admin
I found that the front rubber boot for the drive shaft has a crack and I am waiting for a replacement one to arrive.

Last year, I loaned the k75 to a friend and when he was riding on my back, I could see the head lights going on and off. I decided to investigate the problem and this is why I had the fairing removed. I spent 2 days pulling my hair.

25 years ago, the bike has been modified to accept the 2 headlights of the Sprint fairing. When I got the bike, I just replaced the headlight fuse with a 15A breaker. As a result of a short, the breaker was tripping and resetting itself (See pictures of the melted sockets).

The bike had always the best headlight and I finally discovered why.
When switching to high beam, the low beams always stayed ON. No wonder that I liked it... It was a total of 240watts of light.
The modification was so well done that it looked like original. Without the detailed color schematic, I would not have found it. Check this extra connector in the electrical box

Replacing the gear box Dsc_1525

The bulb's sockets had melted from the heat generated by the bulbs.

Replacing the gear box Dsc_1610

To be continued.....


__________________________________________________
Replacing the gear box Frog15Replacing the gear box Logo2101986 k75, 1985 K100rt, 1985 K100rt/EML GT2 sidecar, 1999 K1200lt/Hannigan Astro Sport sidecar.
    

7Back to top Go down   Replacing the gear box Empty Re: Replacing the gear box Thu Feb 24, 2011 7:36 am

Stout

avatar
active member
active member
Crazy Frog wrote:
Stout wrote: This is probably already on your list, but it is well worth disassembling the clutch bellcrank to clean and lubricate the needle roller bearings inside.

Sorry, I don't know what needle rollers you are talking about. Anything on the back of the clutch housing are lubricated by the motor oil.
What is important to grease are the splines of the gear box input shaft (This is maybe what you wanted to refer to). You should use the same grease as for the splines on the drive shaft.
The external needle bearings requiring a great care (cleaning and greasing) are the ones on the clutch lever. BMW wants $228 for the lever alone. It must be a piece of gold coated with aluminum affraid See the detailed prices here

OK Bert, you call it a lever, I call it a bellcrank. Either way, we are talking about the same bearings. Very Happy


8Back to top Go down   Replacing the gear box Empty Re: Replacing the gear box Thu Feb 24, 2011 9:00 am

87m6chris

87m6chris
Silver member
Silver member
Hey Bert, where did you find that 3M black reflective tape?
I'm not having much luck at my local bike shops.
Thanks,
Chris


9Back to top Go down   Replacing the gear box Empty Re: Replacing the gear box Thu Feb 24, 2011 9:46 am

Crazy Frog

Crazy Frog
admin
admin
I didn't buy it in a motorcycle shop. I got it from 3M trim-line . (They have 2 outlets in Ontario). The guy here was very nice and gave me the end of a roll. It comes in 2 feet wide and if I recall, it's about $45 a linear foot.

Later, I had this company cutting a batch of motoman for members of the N.S. BMW club. 100 stickers cost only 1/2 of the best price found in motorcycle shops.

Replacing the gear box 8265-500x600

Ascycles may have the black stickers cut for the saddle bags in stock.


__________________________________________________
Replacing the gear box Frog15Replacing the gear box Logo2101986 k75, 1985 K100rt, 1985 K100rt/EML GT2 sidecar, 1999 K1200lt/Hannigan Astro Sport sidecar.
    

10Back to top Go down   Replacing the gear box Empty Re: Replacing the gear box Fri Feb 25, 2011 9:21 am

Crazy Frog

Crazy Frog
admin
admin
Here is another improvement for visibility (did that about 10 years ago): adding 2 extra stop light bulbs. This is inexpensive and easy to do.
I originally installed dual functions bulbs (tail light/stop light) but after testing, I found that the most efficient was to have only 2 side stop lights.
If you want to get a brighter tail light, the best is to re-wire the original stop light bulb into a second tail light, and install both stop lights on the side.
This installation doesn't require a lot of modification as it seems that the original was almost designed to accept the 2 extra bulbs.

Replacing the gear box Dsc_1611


__________________________________________________
Replacing the gear box Frog15Replacing the gear box Logo2101986 k75, 1985 K100rt, 1985 K100rt/EML GT2 sidecar, 1999 K1200lt/Hannigan Astro Sport sidecar.
    

Sponsored content


View previous topic View next topic Back to top  Message [Page 1 of 1]

Permissions in this forum:
You cannot reply to topics in this forum