BMW K bikes (Bricks)


You are not connected. Please login or register

Go to page : Previous  1, 2

View previous topic View next topic Go down  Message [Page 2 of 2]


barryt


Silver member
Silver member
Next, you need to remove the 2 bolts on either side of the gearbox where it holds the gearbox to the bike's frame.

The one on the RHS is depicted below:

My 1986 K100RS restoration - now complete! - Page 2 Dsc01119


barryt

barryt
Silver member
Silver member
Be sure not to undo the bolts from the frame to the bell-housing at this stage.

For those folks who are unsure what the bell-housing is, it is this thing:

My 1986 K100RS restoration - now complete! - Page 2 Dsc01120


barryt

barryt
Silver member
Silver member
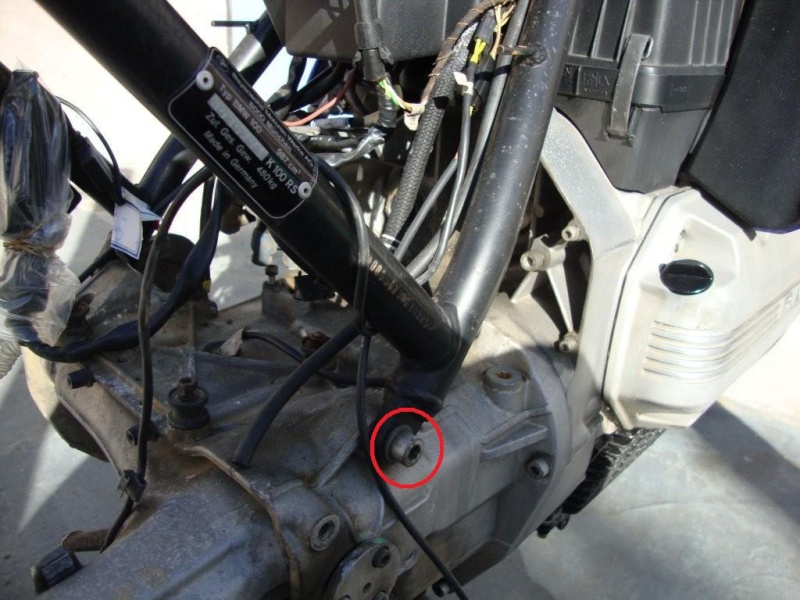
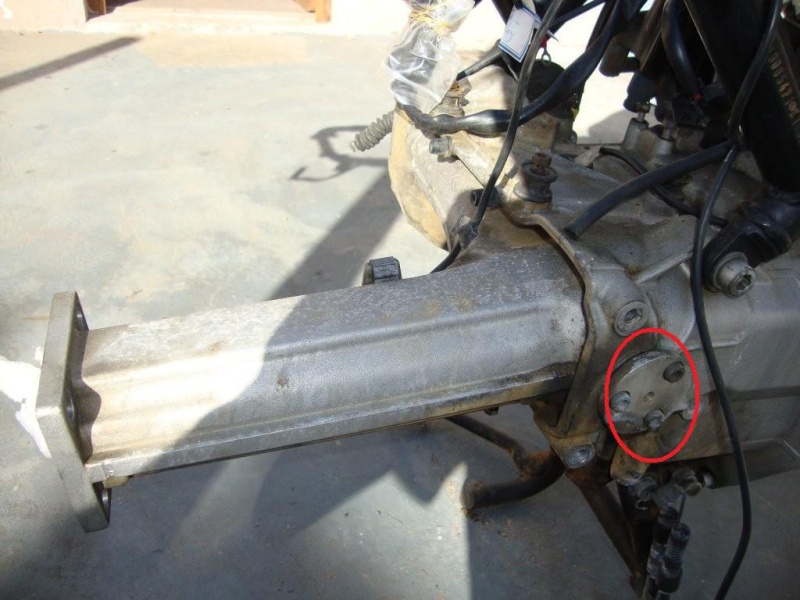
Having removed all the bolts described previously (an easy job with the right tools), the gearbox will now be supported by nothing but the dowels and the crankshaft spline inside.

This is why I like to have a "right size" old paint-tin or something under my gearbox while removing the bolts to take some of the weight - I feel its a bit unfair to ask just those 2 dowels to hold the entire weight of the gearbox....Wink And also, how can you be sure of the condition of your dowels?

If they are a bit "shot", the gearbox may just fall on the floor when you undo the last bolt! (But you will suspect this, because the last bolt will suddenly be rather difficult to remove!).

The next thing you need will be a rubber mallet. Don't use a steel hammer or anything similar, unless you'd like to booger up your aluminium (read butter) casing of the gearbox.

With a few sharp taps (not too hard - start lightly first) on either side of the gearbox you should see a crack (read "gap") suddenly start appearing between the gearbox and the bell housing.

When it's about 2mm wide (the gap that is), you are probably ready to take a firm grip on each side of the gearbox with your hands and man-handle the thing off the back of the bike.

What you are doing is "man-handling" the gearbox off the dowels, and alsooff the crankshaft splines. (Neither of these should stuck fast, but one never knows depending on when the splines were last greased or how much the dowels rusted over time - mine were both in perfect order, although the splines were lacking a bit of grease).

Easy peasy.

It weighs about 10kgs if I am not mistaken - no great shakes - same as a big bag of dog food...Wink

But all the same, it's not exactly light, so be careful - you don't want to drop it and nor do you want to crush body parts of yours while doing it.

Also, be careful not to "wiggle" left and right tooo much, because the clutch selector lever is sticking out into the engine from the gearbox throught the clutch itself - we don't want to break that!

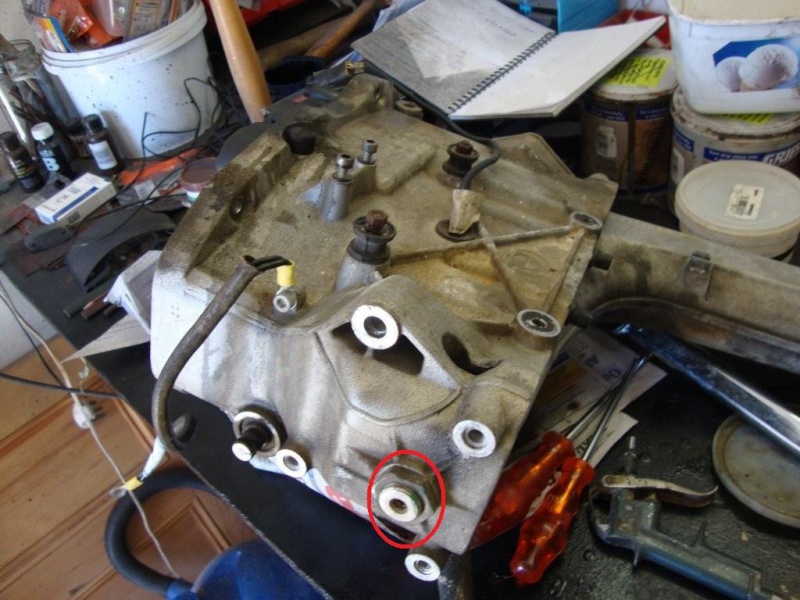
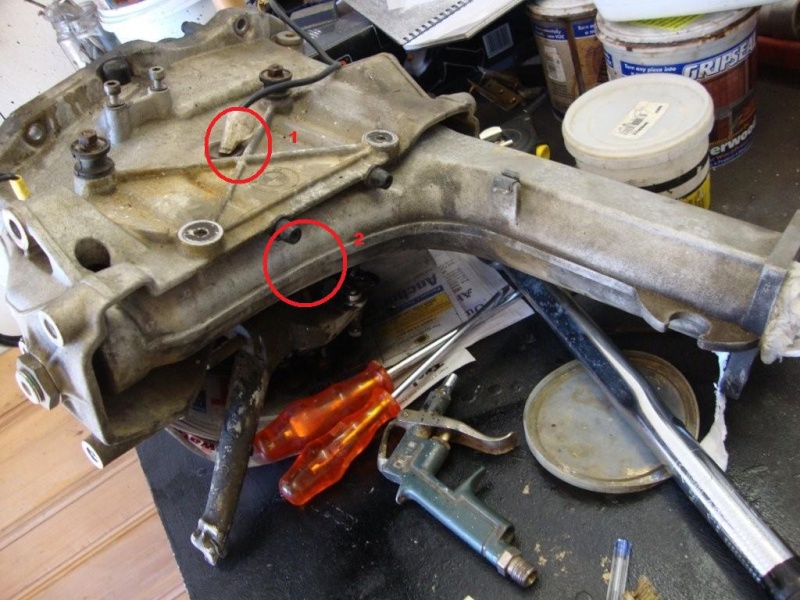
Here is a picture of what I'm talking about taken from the front of the gearbox (the part that sticks into the engine), with the splines and clutch selector hi-lited:

My 1986 K100RS restoration - now complete! - Page 2 Dsc01121


Last edited by barryt on Wed Jan 19, 2011 4:15 am; edited 1 time in total


wikur

wikur
Silver member
Silver member
What`s the mileage on your bike?
Would be interesting to know as your splines seemes to be in good condition.
I`m shure my gearbox has never been removed and I`m close to 100,000 km`s now.
Great pics!
Cheers,Wikur!


barryt

barryt
Silver member
Silver member
Splines in great condition Wikur - (I thought anyway).

87000 odd kms on the clock - but don't know if that can be trusted because when I bought the bike the speedo didn't work - and it still doesn't...see my post elsewhere on this forum pleading for help! ... Wink


wikur

wikur
Silver member
Silver member
I too had problems with the speedo but a cleaning and deoxing of the connections inside the instrumenthousing cleared that problem.
There`s a great tutorial somwhere on this forum.
I`m about to take my gearbox off,just have to wait another two weeks before there`s space enough in my buddys garage.
Cheers,Wikur!


Crazy Frog

Crazy Frog
admin
admin
If you plan to use the studs to reinstall the gear box, you can use them to hold the gear box during removal too Laughing
The gear box will just slide on them.


__________________________________________________
My 1986 K100RS restoration - now complete! - Page 2 Frog15My 1986 K100RS restoration - now complete! - Page 2 Logo2101986 k75, 1985 K100rt, 1985 K100rt/EML GT2 sidecar, 1999 K1200lt/Hannigan Astro Sport sidecar.
    

barryt

barryt
Silver member
Silver member
Cunning plan Frog... Cool


wikur

wikur
Silver member
Silver member
Made the studs at work today.
Thanks CF
Anything that can make this job easier is much appriceated........
Cheers,Wikur!


Leon

Leon
active member
active member
hi there
Enjoying your restoration topic alot. Picked up a few good pointers which I have written down for future reference. Keep it coming Very Happy

Regards
Leon


wedge

avatar
active member
active member
Normally I'd agree with you on our american cousins feeling the need to change the spelling of certain words.
Unfortunately in this case, aluminium was called aluminum first and it was the brits that changed it!!!


barryt

barryt
Silver member
Silver member
Really Wedge? Fascinating....I stand corrected...Wink

More coming soon on the restoration Leon.


barryt

barryt
Silver member
Silver member
Next up, you want to remove the swing-arm.

To do this, you need to undo this nut first, hi-lited with the red circle.

My 1986 K100RS restoration - now complete! - Page 2 Dsc01122

You will need a fairly big spanner for that and it will take a number of turns - it looks tight but it isn't really - but I found it did take a fair amount of force on each turn until it finally came out - it did not come out that easily.

(Try supporting the swing-arm a bit and "jiggling" a bit as you turn to ease the process - that seemed to help for me).


barryt

barryt
Silver member
Silver member
Next you need to remove the bolts holding the swing arm on the other side of the gearbox....there are 3 allen bolts to start with, depicted here:

My 1986 K100RS restoration - now complete! - Page 2 Dsc01123

Then you need to remove the disc which is behind the allen bolts, once the bolts are out.

This proved a bit problematic for me and I battled a bit to get it off, together with the bolt going into the bearings of the swing-arm.

In the end I pried it off gingerly by wedging a flat screw-driver between the disc and the gearbox casing...


barryt

barryt
Silver member
Silver member
Once you have the swingarm removed you can take a good look at the bearings and re-pack them with grease again. Mine looked and felt fine so I didn't go down that route and just left them.

How do you know if they are OK? I don't really know, save to say that as long as everything is moving nicely with nothing getting "stuck" in places or any horrible grinding noises - they probably are.

It's probably a good idea having gotten this far to remove the bearings anyway while you are here and pack them with new grease just for good measure, because, hey, why not? ... Wink

I suppose I failed myself there - but it was weekend and I was getting ready to have a braai (that's barbecue to you Americans), so I didn't bother - thats how we do things in South Africa...he he....we often check things "by feel" only... Wink

Then you may as well give the gearbox a good clean and degrease, possibly giving it a new coat of paint as well.

Often talked about is a faulty gear number indicator up on the instrument cluster - sometimes showing the wrong gear, or weird patterns in the digital readout etc.

In this next pic you can see the areas which are often talked about in terms of the connections feeding that digital readout from the gearbox.

In the number 1 red circle is the wire leading into the gearbox and which has a connector normally further up near the battery which then runs up into the instrument cluster.

In the number 2 red circle is where you want to be focussed if you have the "bad gear indicator" problem. Circle 2 hi-lites where you will find the connector - (it is actually BEHIND the swingarm).

Once the swing-arm is off you will see it easily enough.

Apparently it is important to make sure this connection (behind the swingarm) is thoroughly clean and dry (inside and out) - you will probably have to unscrew the cap to get inside the connector:

My 1986 K100RS restoration - now complete! - Page 2 Dsc01124

You can dry it out with compressed air I guess.

I was very sorry I never read about this issue sooner on the website because my bike has the faulty gear indicator problem and I only established what the solution is (cleaning this connector in Circle 2) AFTER I had put the whole bike back together again!

Rats!

Guess I will be dismantling and going back in there again sometime when I get some time again...such is life and the South African way, braais and all... Wink


wikur

wikur
Silver member
Silver member
How was the condition of your clutch arm bearings ?
I think Motobins sell an arm with a grease nipple.
Maybe cleaning and regreasing is enough.
Cheers,Wikur!


Last edited by wikur on Tue Feb 01, 2011 11:31 am; edited 1 time in total


walfish

walfish
Life time member
Life time member
stripping down again would only be a 3 to 4 hr turnaround, timings taken on a papsak and potjie recipe Laughing


barryt

barryt
Silver member
Silver member
Actually not ungaas - I reckon I can get back down there in under an hour now...Wink (THat would be while the potjie is still warming up the oil for the onions)... but I just have to psyche myself up first...In fact, for fun, I am going to time myself like a pit stop when I do it sometime in the future - while being cautious and not damaging anything or myself in the process...reckon I will be there in less than an hour...


charlie99

charlie99
VIP
VIP
good write up barry .....thanks ...keep it coming


__________________________________________________
cheezy grin whilst riding, kinda bloke ....oh the joy !!!! ...... ( brick aviator )

'86 K100 RT..#0090401 ..."Gerty" ( Gertrude Von Clickandshift ) --------O%O
'86 k100 rs.. #######..  "Fred " (f(rame) red ) ( Fredrick leichtundschnell ) - -
bits and pieces from many kind friends across the k100 world ...with many thanks ..
1987 k100rs ########   "Red"  - (red sports rs TWB style )
1989 K100rt #009637   "Black Betty"  (naked rt ala Nigel , now sporting an rs main fairing )
    

walfish

walfish
Life time member
Life time member
know the feeling barryt, mine's been off the road for near 2 months now, but should the sun start shining she would be back on the road chop chop My 1986 K100RS restoration - now complete! - Page 2 112350


Sponsored content


View previous topic View next topic Back to top  Message [Page 2 of 2]

Go to page : Previous  1, 2

Permissions in this forum:
You cannot reply to topics in this forum